Registered servers, if you have not used them, have a few really nice time savings features. But did does allow you to make mistakes easily. What are those mistakes? Making an update on an expected server, updating multiple servers. You might not even know you could do that. I work for a local government at the county level. We have a hand full of network engineers and application developers, but only one database administrator. I have been using the Registered Servers feature of SSMS for a while. I have even started to teach others how to you this and why.
Why
- Organization, I color code the servers, add tooltips for more details.
- At the launching point, I hardly ever log on directly to a server to run SSMS, except in an emergency when I can’t log on from my desktop.
- More work with less time. I can run a query against multiple servers at once.
When you open Registered Servers for the first time, it is empty. I created an example of a few servers to show you what I mean.
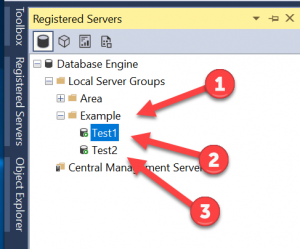 1. is the server group,
2. Is the first server in the group
3. Is the second server in the group
From here, you can reference the test1, test2, or both servers. All you have to do is double-click on the icon next to the name. But if I double-click on the group, I am creating a connection to both of the servers at once. Any query will on both servers at once using both connections.
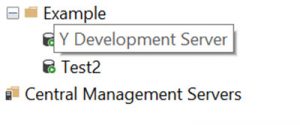
The added bonus is the servers listed can give you information on them if you hover over them. Below is an example of the hover text (tool-tip).
How do we set them up?
Create the group by right-clicking on the folder Local Server Groups and “select create the group.”
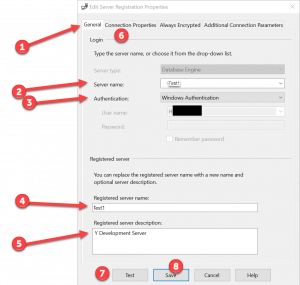 1 Start with this tab. This is the main configuration
2 Enter the actual server name. We can alias it later if you want.
3 Add in your SQL creds. I hope you are using the active directory to make your life easier.
4 the alias name of the server
5 The Tool-tip for the server. We have a few clown cars, so I like to put the description and main system that uses this database server.
6 Skip, for now, Select 7, test the connection.
8 save for now.
Finally, let’s go back to the next tab, 6, on Connection Properties.
This is where you will make this work the way your agency needs you to. Add in the timeouts, packet size, certificate, and encryption items you need. The last item is the organizational item you need to use. It is not required, but it sure helps.
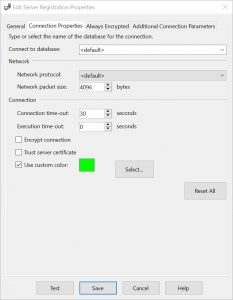
Notice I set mine to green, this is not the default, but I always set the color.
Here is how I use colors:
- Red – Production
- Yellow – Quality Assurance
- Green – Test, and Training
- Blue – Development
- Brick – Clusters / and Availability Groups
- Pink – Multi-server
Remember to save again.
So now let’s test this to see how it work:
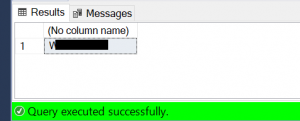
We will run a simple “SELECT @@SERVERNAME;” on all three examples.
The Fist test will be on test1 a testing server:
Notice the green bar on the bottom? The test is on test2, a Quality Assurance server.
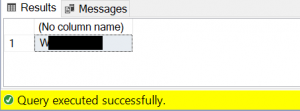
Again the bar is now yellow. Now, we will do the file test, clicking on the server group folder icon. The bar will be pink.
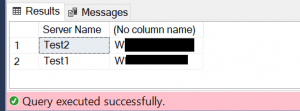
But check that out. The results ran twice—one for each server.
Organize Registered Servers
I have registered groups a few ways,
By department, county government, we run 20+ business units. By SQL Server version, so I can run the same code on all my SQL 2017 servers and then a different one on all the SQL 2012 group of servers. The third group is by location, we have multiple data centers, and this allows me to work in one of them at a time if needed. I have created a server group for the cloud but have used it very little so far, but I expect this to change in time. Helping make your databases; fast, reliable, secure, and less downtime. Need help making this happen?